1 Introduction
If you are a GitHub user, you probably have seen those little images in the README of your favourite repositories. For example, let’s check Pandas’:
But what are these images and what do they mean? In the first place, these images are called “badges” and they show the resulting status of different workflows. Most of these workflows are part of what is called CI/CD, short for Continuous Integration and Continuous Deployment, respectively.
In CI/CD workflows DevOps and Software Engineers create “tests” for repositories where people collaborate coding. The aim of these tests is to check that new code does not break existing code. You can read more details about CI/CD here: https://docs.github.com/en/free-pro-team@latest/actions/guides/about-continuous-integration
2 GitHub Actions
GitHub actions is a tool to run these workflows and the best part is that is completely integrated to GitHub. Go to any of your repositories and look for the “Actions” tab:

Also, GH Actions are free of charge up to a quota of 2000 minutes per user per month. That means that you can have several workflows, set up on different repositories, and the time they take to run should be less than 2000 minutes per month, to keep using it free of charge.
3 I’m a Data Scientist, not a DevOps
Q: Hey! I’m a Data Scientist, not a DevOps nor a Software Engineer. Why should I care about this?
There are many reasons, but the ones I find most powerful are:
- You can use GH Actions to run scripts on schedule, without worrying about setting up virtual machines on the cloud.
- You can integrate the workflow to the repository seamlessly. That is, the workflows can read from and write to the repository where the code lives.
- You have all the power
gitcan offers: version control, collaboration, branches, diff, and more.
IMHO GitHub Actions is a super tool to run ETL workflows.
4 Still not convinced, show me an example
To show you the power of GH Actions I made a scraper in python to scrape the daily updates on Covid-19 in San Juan Province, Argentina.
The local government maintains a dashboard with the updates: https://sisanjuan.gob.ar/modulo-coronavirus
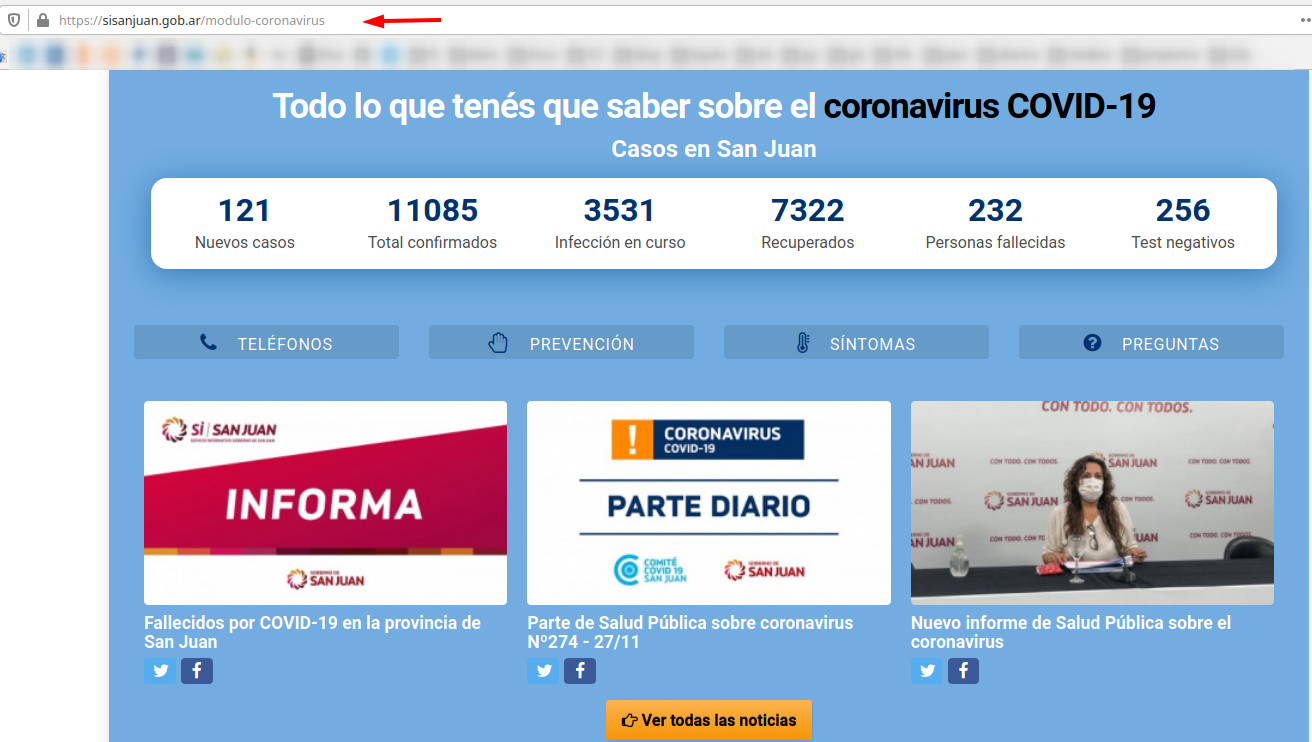
The dashboard is updated everyday between 19:30 and 21:00 UTC-3. The problem is that it only shows daily updates, but there is no track of the historical data.
To keep a record of all this data, I made python script that scrapes the dashboard and appends the results to a csv file. The resulting csv file is saved in folder data/
Everything is on the GitHub repository: the py script, the data saved as a csv file, and the yml workflow.
5 Our first GH Action
Everything is this section is taken from GH’s documentation: https://docs.github.com/en/free-pro-team@latest/actions/learn-github-actions/introduction-to-github-actions.
To enable GH Actions on your repository you first need to create a directory called
.github/workflowsIn the
.github/workflowsdirectory, create a new file with the name you want for your workflow and the extensionyml. For example, mine is:scraper-sj-gobierno.yml

(Take into account that yml files are indentation sensitive)
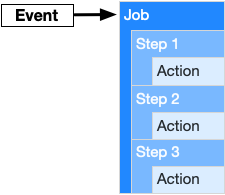
For the sake of understanding this tutorial, go to the GH documentation link above and read about the vocabulary related to GH Actions: event, jobs, actions, etc. The following image helps understanding how they relate to each other:
6 Dissecting the workflow
All the magic happens in the yml file we saved to .github/workflows, i.e. in scraper-sj-gobierno.yml. Find below the complete code:
name: scraper-san-juan-gobierno

on:
  schedule:
    - cron: '0 12 * * *' # runs at 12:00 UTC everyday

jobs:
  build:
    runs-on: ubuntu-latest
    steps:

      - name: checkout repo content
        uses: actions/checkout@v2 # checkout the repository content to github runner

      - name: setup python
        uses: actions/setup-python@v2
        with:
          python-version: '3.7.7' # install the python version needed

      - name: install python packages
        run: |
          python -m pip install --upgrade pip
          pip install -r requirements.txt

      - name: execute py script # run sj-gobierno.py to get the latest data
        env:
          EMAIL_ADDRESS: ${{ secrets.EMAIL_ADDRESS }}
          EMAIL_PASSWORD: ${{ secrets.EMAIL_PASSWORD }}
          EMAIL_RECIPIENT: ${{ secrets.EMAIL_RECIPIENT }}
        run: python sj-gobierno.py

      - name: commit files
        run: |
          git config --local user.email "action@github.com"
          git config --local user.name "GitHub Action"
          git add -A
          git commit -m "update data" -a

      - name: push changes
        uses: ad-m/github-push-action@v0.6.0
        with:
          github_token: ${{ secrets.GITHUB_TOKEN }}
          branch: main
As indentation shows, there are 3 main parts to it which we will analyze in detail.
6.1 Part 1: name
Optional - The name of the workflow as it will appear in the Actions tab of the GitHub repository.
6.2 Part 2: on
Specify the event that automatically triggers the workflow file. This example is scheduled using cron but you can also trigger the workflow based on other events, such as the push event, so that the jobs run every time someone pushes a change to the repository.
If you plan to schedule a workflow, I recommend crontab.guru to construct your cron expressions.
6.3 Part 3: jobs
Groups together all the jobs that run in the yml workflow file. Full details in the following section.
7 Part 3: the details
EDIT: This section has been refactored because of some lines of code missing in the .yml file (see comments section to get more context). Now is fixed. Thanks Matt for the heads up!
7.1 runs-on: ubuntu-latest
Configures the job to run on an Ubuntu Linux runner. This means that the job will execute on a fresh virtual machine hosted by GitHub.
7.2 steps:
Groups together all the steps that run in the job. Each line nested under this section is a separate action.
7.2.1 name: checkout repo content
The uses keyword tells the job to retrieve v2 of the community action named actions/checkout@v2. This is an action that checks out your repository and downloads it to the runner, allowing you to run actions against your code.
You must use the checkout action any time your workflow will run against the repository’s code or you are using an action defined in the repository.
7.2.2 name: setup python
The uses keyword tells the job to retrieve v2 of the community action named actions/setup-python@v2. This action installs python into the runner. You can choose either python-version: '3.x' which installs the latest version of python 3 available, or an specific version of python such as python-version: '3.7.7'
7.2.3 name: install python packages
Using run: |, we run python code in the runner. We first install pip and then the required libraries which are in the requirements.txt file.
7.2.4 name: execute py script
Here we run the python script that scrapes the website. As opposed to the previous step, we don’t need the | because now we call a single line of python code to run the script.
Additionally, here you see the env: keyword which is used to call “GitHub secrets”. I will explain them later.
Even though the pip install step we run previously also runs python code, we called it in a separate step due to the principle of least privilege. You don’t need access to the secrets to install the required libraries, so that goes in a separate step. Thanks to user airtower-luna for warning me about this.
7.2.5 name: commit files
Here we are staging and committing the changes.
7.2.6 name: push changes
We use the action github-push-action@v0.6.0 from user ad-m to push the changes back to the repository.
Note that here there is a line showing ${{ secrets.GITHUB_TOKEN }}. In GH terminology, this is called a “secret”. Secrets are encrypted environment variables that allow you to store sensitive information, such as passwords or API keys. To access the secrets in your workflow you will need the dollar sign, the double curly braces, the word secret followed by a period and your secret’s name. Something like this: ${{ secrets.SECRET_NAME }}
GitHub automatically creates a GITHUB_TOKEN secret to use in your workflow, so you don’t have to worry about creating this. The GITHUB_TOKEN secret allows us to authenticate ourselves (in this example is needed to push the changes).
On the other hand, the secrets EMAIL_ADDRESS, EMAIL_PASSWORD and EMAIL_RECIPIENT we used in a previous step are not created automatically and need to be set up. I recommend checking another blog post I wrote specifically on GitHub secrets to get full details on how to create yours: https://canovasjm.netlify.app/2021/01/12/github-secrets-from-python-and-r/
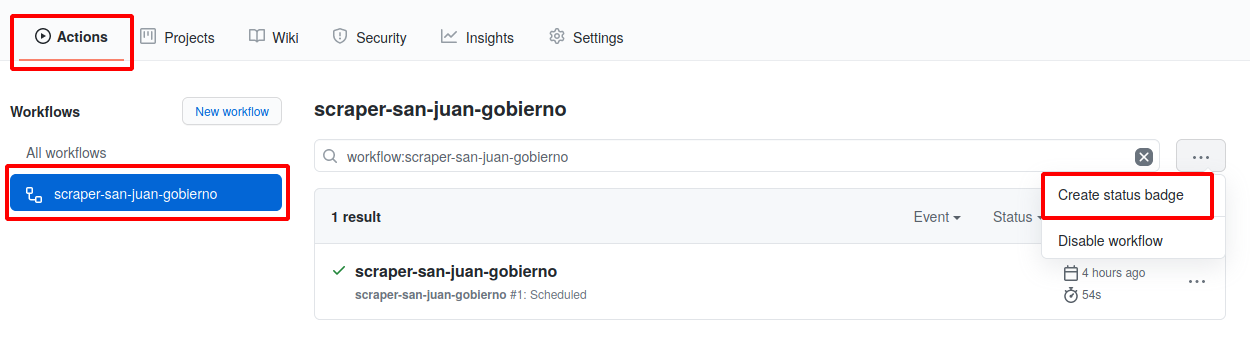
8 Claim your badge
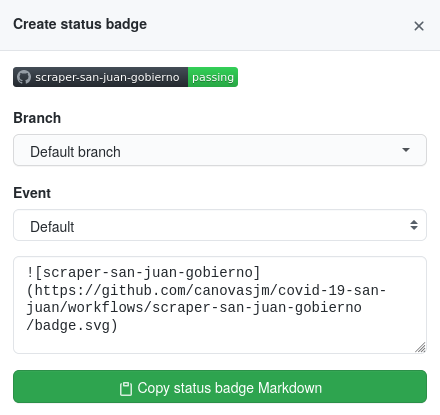
To show your badges you need to go to “Actions”, select the name of the workflow, click on the \(\cdots\) menu and then click on “Create status badge”.
This will pop up a window where you can “Copy status badge Markdown”
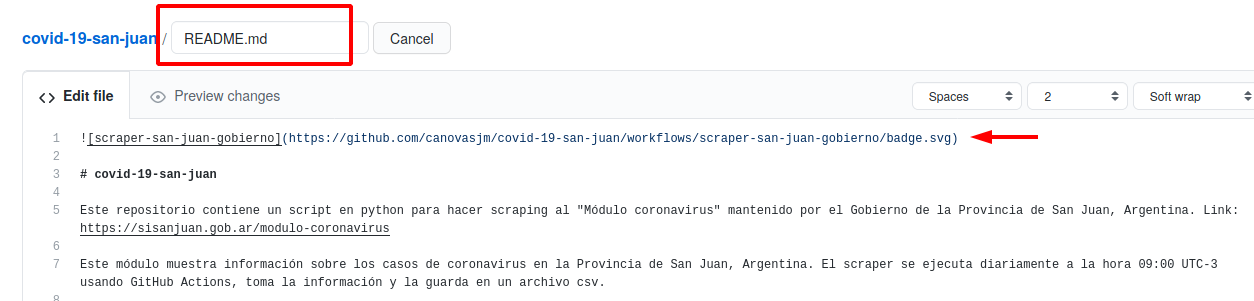
Finally, edit your README.md file and paste the copied text on top:
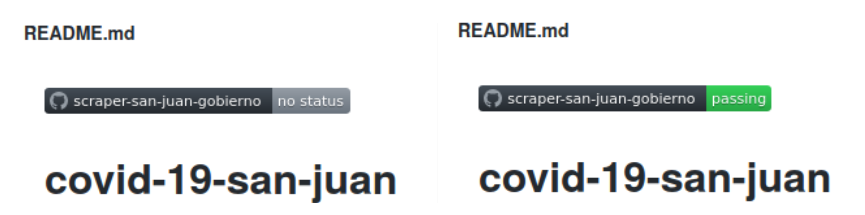
At first, the badge will be grey and showing the legend “no status”. After it has run successfully, it will change to green and “passing”.
9 Where to go next
You can also set up the workflow to only run on certain branches, paths, or tags. For syntax examples see: https://docs.github.com/en/free-pro-team@latest/actions/reference/workflow-syntax-for-github-actions#onpushpull_requestpaths
GitHub Actions documentation: https://docs.github.com/en/free-pro-team@latest/actions
GitHub Actions starter guide: https://docs.github.com/en/free-pro-team@latest/actions/learn-github-actions#creating-a-workflow-file
GitHub Actions cheatsheet: https://resources.github.com/whitepapers/GitHub-Actions-Cheat-sheet/
GitHub secrets: https://docs.github.com/en/free-pro-team@latest/actions/reference/encrypted-secrets
YAML syntax: https://www.codeproject.com/Articles/1214409/Learn-YAML-in-five-minutes
Discussion about GH Actions on branches: https://stackoverflow.com/questions/63436541/github-action-workflow-schedule-not-working-on-non-default-branch