1 Introduction
As a continuation of my last post, I have been playing around with Shiny apps for a few weeks now. One way to share your Shiny apps is through shinyapps.io, maintained by RStudio. But you can also deploy your own Shiny server and that is what we are going to see now.
Generally speaking, one can set up a virtual machine running Linux (from now on, our Linux server), install the necessary packages, and finally save your Shiny apps in a folder within the server. If everything is set up correctly, a person pointing to the Shiny app’s url should be able to see it on their browser.
Particularly, our virtual machine will be set up in Microsoft Azure and will be running on CentOS Linux. After that, we are going to enable the corresponding port to serve Shiny apps and install base R, {shiny}, {rmarkdown}, and Shiny server.
2 Create a VM in Microsoft Azure
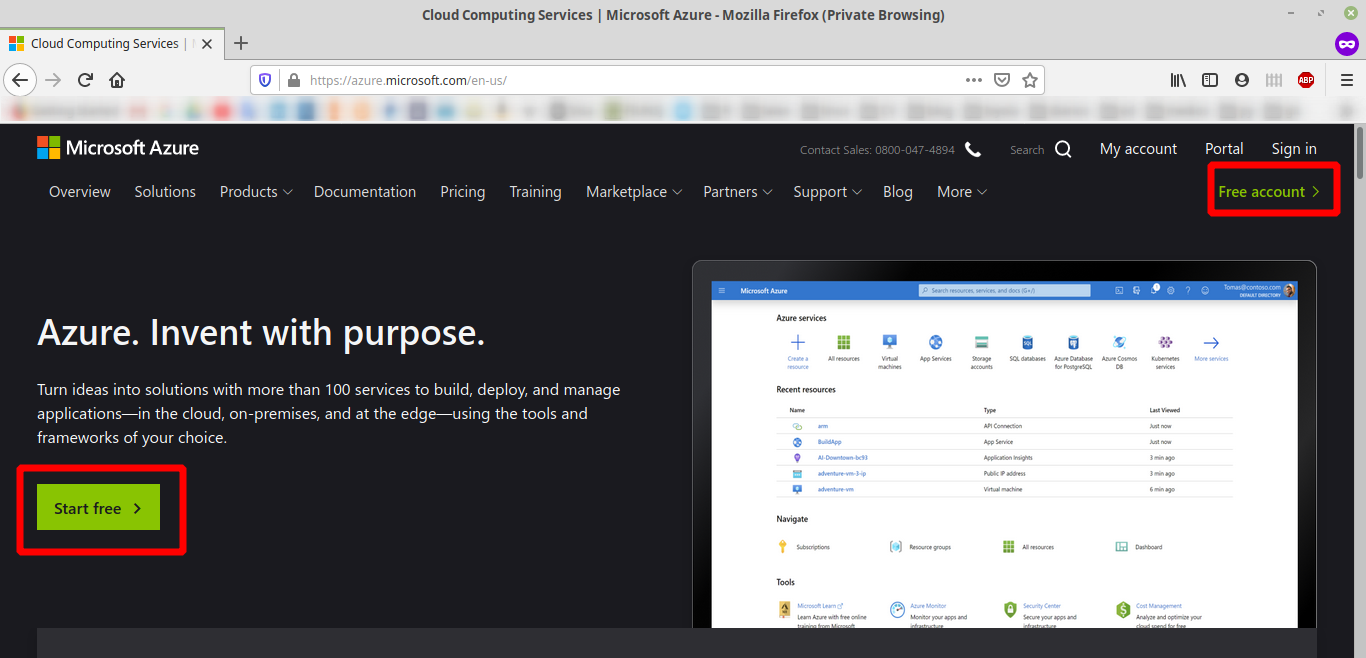
The first thing you need to do is to sign up for a free account. Go to https://azure.microsoft.com , choose “Free account” or “Start free”, and then follow the steps there.
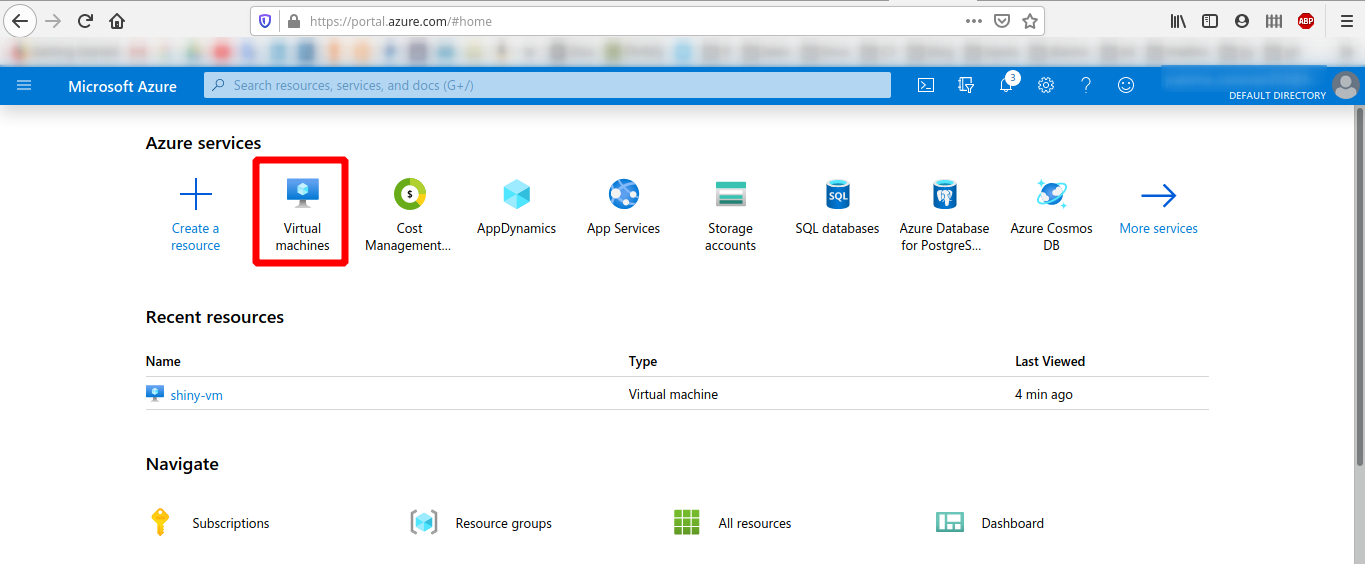
Once you have your account go to “Virtual Machines”.
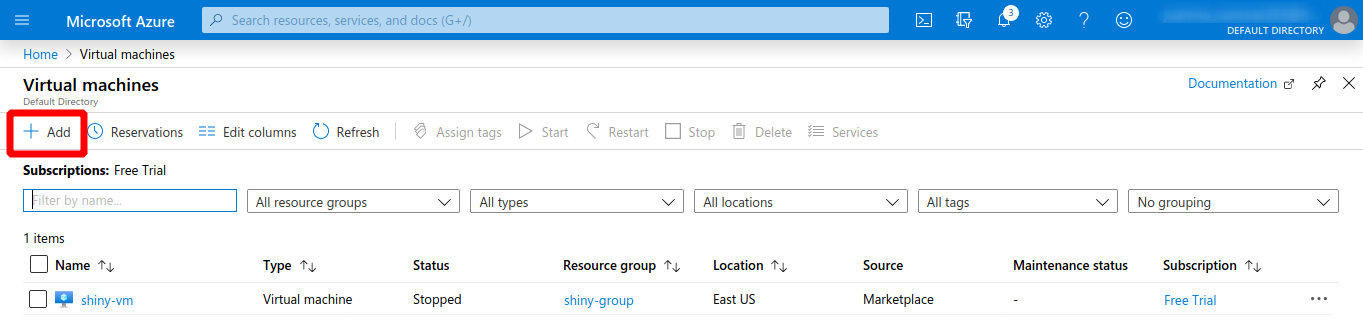
Inside there, click on “Add”.
The next step is going to ask you for a “Resource group” (my resource group is called shiny-group). If you don’t have any, just click on “Create new”. Next, you have to provide a name for your virtual machine (my VM is named testing-vm).
You also need to select one Linux image for the server. If you plan to follow this tutorial, then choose CentOS because the commands we are going to run later are proven to run in CentOS. Otherwise, you can choose any available Linux image (Ubuntu, RHEL, SUSE, Debian) but not Windows Server because Shiny server doesn’t run there.
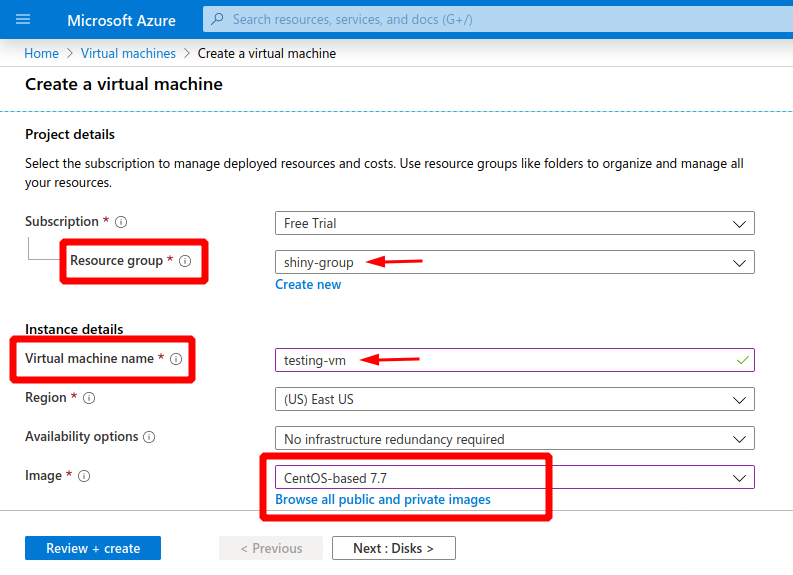
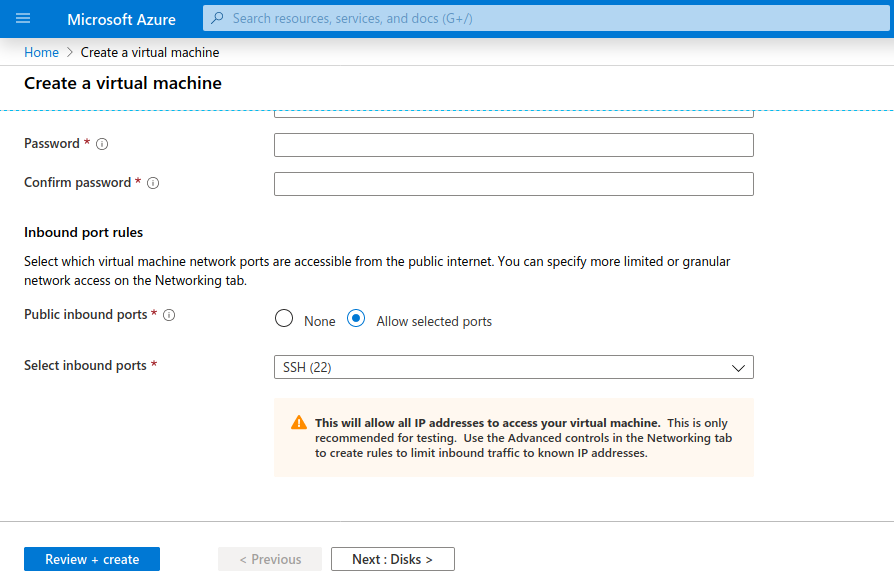
In the bottom of the page, you will find the authentication type. If you don’t know what SSH is, then choose “Password” and create a username and a password (my user name is juanmanuel). You can choose different hardware settings clicking on “Change size”, but keep in mind that anything less than 1GB of RAM on your server may cause the installation of Shiny Server or its related R packages to fail.

Finally, in port inbound rules leave it as it is.
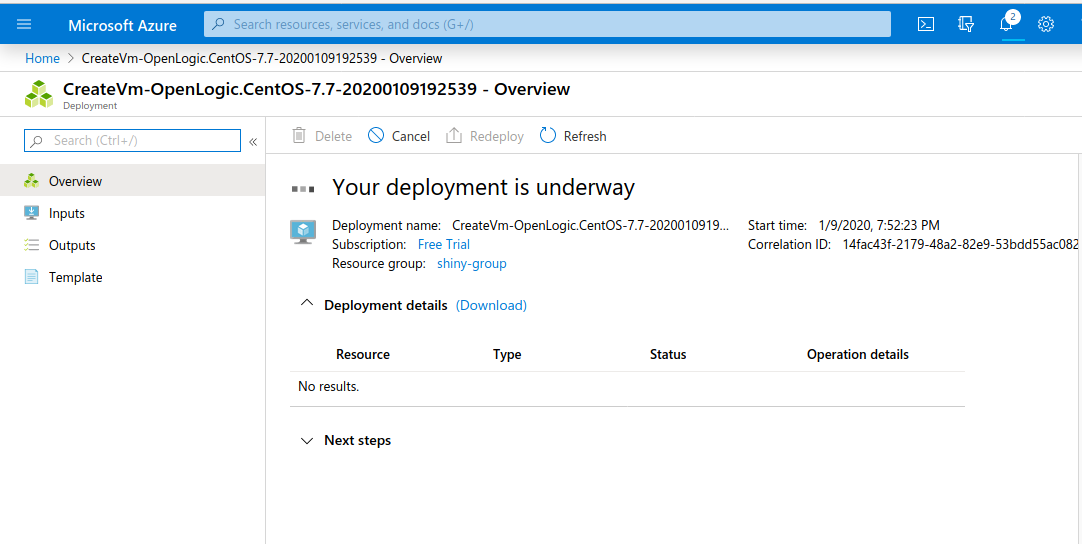
For the scope of this tutorial you can go on with the defaults for the rest of the settings and create the VM. It will take some minutes to create.
Once the process is finished, you will be able to see the VM in Home > Virtual Machines. Note that testing-vm has been created and is Running (for reference, I have another VM called shiny-vm which is Stopped (deallocated)).
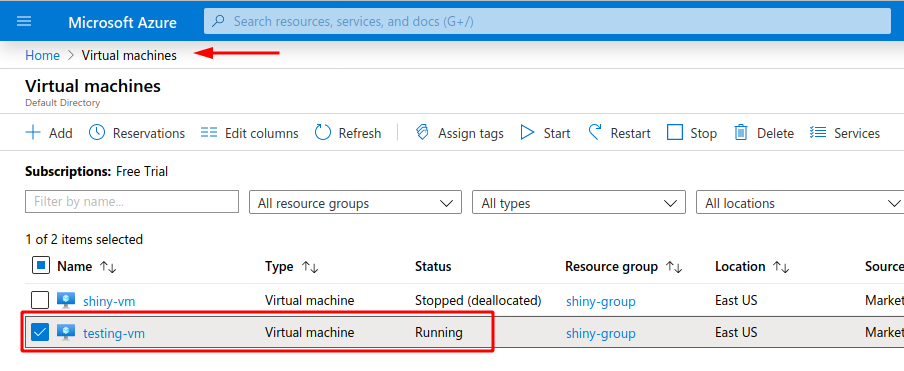
Bear in mind that as long as the VMs are running, Azure is either charging you or taking it from your trial balance. So if you want to take a break, select the VM by clicking on the check box next to its name and then hit Stop in the ribbon above.
3 Log in into the VM
This can be particularly challenging, so we are going to treat it on its own section and step by step. We still need to install packages in the server we have just set up… but how are we going to do so, if we don’t have physical access to it?
The answer is through the Internet. Using our own laptops, we are going to log in into the server and take control of it. The steps below show you how to connect a local computer running Linux (i.e. your laptop) to our VM using the Linux terminal. As far as I know, the steps also work for Mac computers though I haven’t tried them by myself.
3.1 Get the public IP of your VM
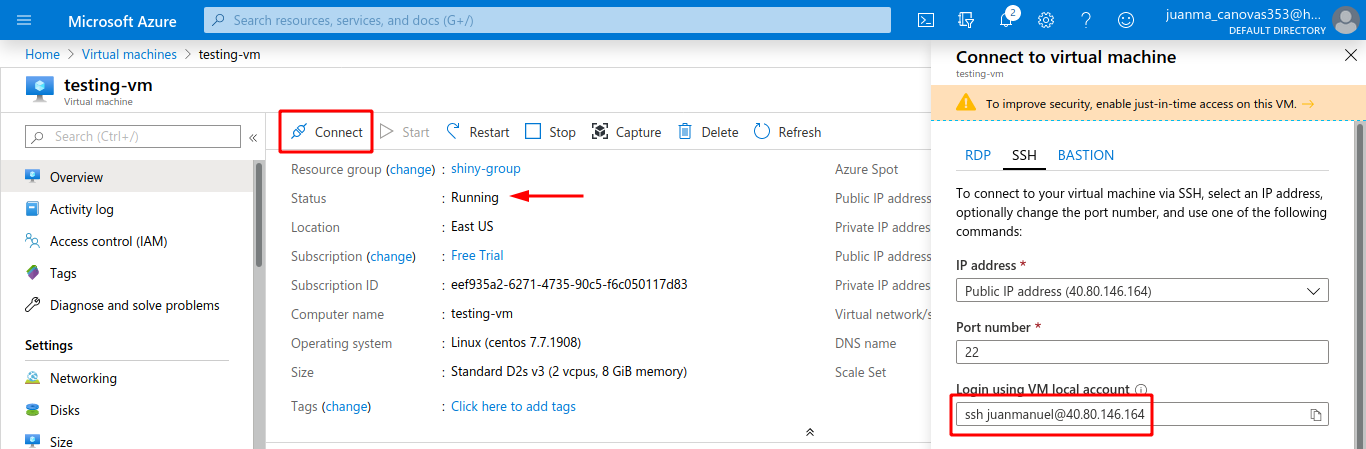
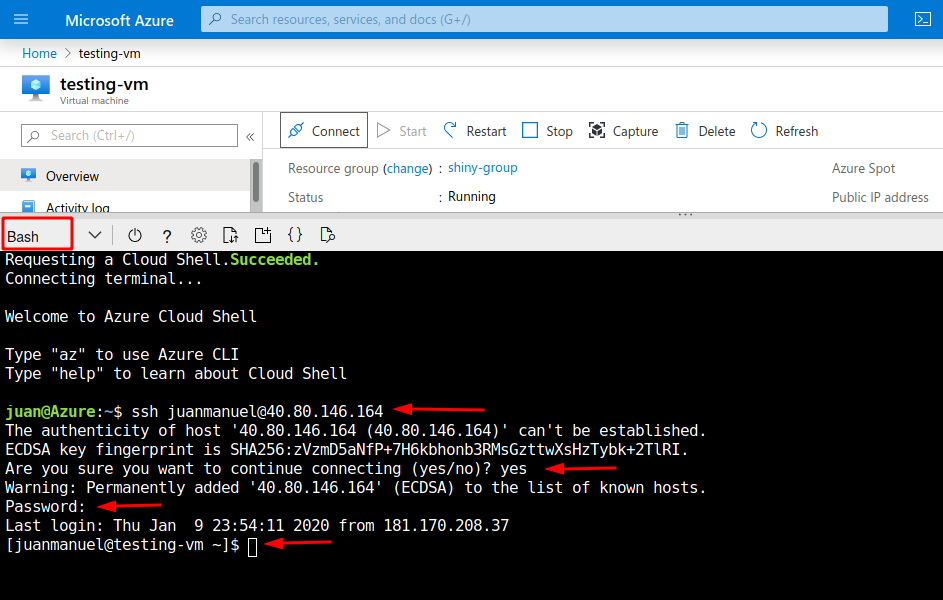
In order to log in, we will need the public IP. You can get that information and more by clicking on the VM’s name here: Home > Virtual Machines > testing-vm. Once there, Azure shows a summary for that VM. As long as the VM is Running it will have a public IP.
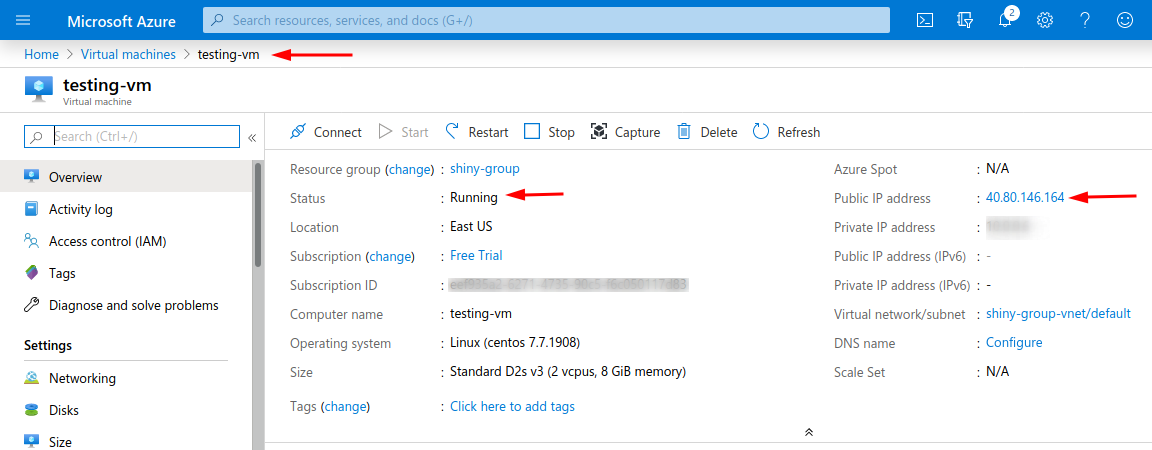
Then click Connect on the top left and a pane on the right of the screen will show up. From the there, copy the last line which in this case is ssh juanmanuel@40.80.146.164
3.2 Open a Terminal
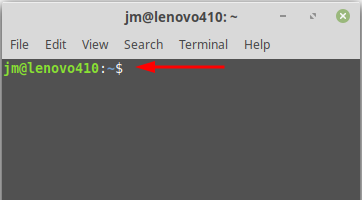
In many Linux distros Ctrl + Alt + T will launch a terminal. In general you will see the username, the computer you are controlling name’s, and the current directory.
In the following screenshot that sequence is coded the following way: username@computername:currentdirectory$.
Different Linux versions may show this information with its own flavour, but the general structure is going to be similar. I am using Linux Mint with the Cinnamon desktop and here we have:
- Username is
jm
- Computer name is
lenovo410 - Current directory is
~. The tilde symbol represents the home directory, so alternatively the current directory is/home/jm
Excellent videos on the Linux file system are this by DorianDotSlash and this by Joe Collins.
3.3 Connect to the VM
In the terminal type your version of ssh juanmanuel@40.80.146.164 (you have to change the username as well as the public IP) and hit enter. Then write your password and hit enter again (when writing your password the screen will remain empty but, don’t panic, it’s working). If everything went as expected, you should be seeing something like this:
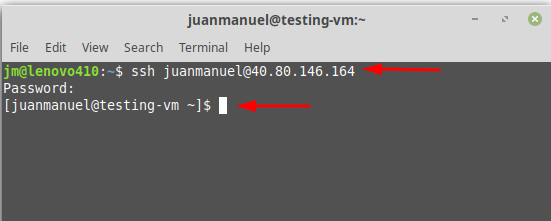
The image above is a fundamental thing to understand:
- on the first line we were on
jm@lenovo410(namely, my laptop) where we executed a command, - on the second line we introduced our server’s password,
- and in the third line we are in
juanmanuel@40.80.146.164(namely, the server a.k.ajuanmanuel@testing-vm).
From now on every command we run on the terminal is going to take effect in the server, not in our laptop.
3.4 That’s so cool, but I’m on Windows… how can I proceed?
Yet another reason to leave Windows once and for all!. To connect a Windows laptop to our server you will need an SSH client. One of them is called PuTTY.
Another way is using Azure’s console which is essentialy the same we are doing in our Linux terminal. With the VM running click on the >_ symbol in the blue ribbon.
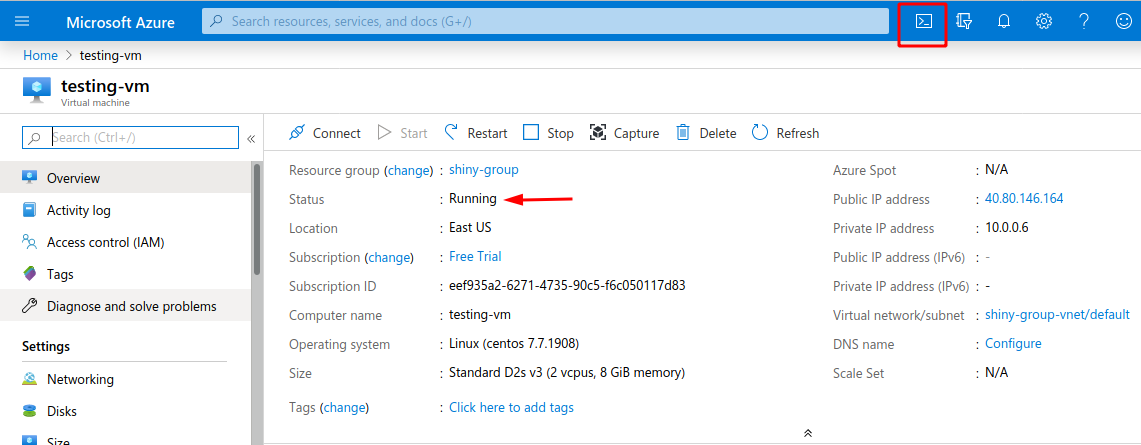
It will open a terminal in the bottom part of the screen. Make sure it says Bash in the top left corner; if not use the dropdown menu to change it. From now on, the steps are the same as in 3.3)
4 Time to instalaR
The steps from this section onwards are valid for every CentOS server. In other words, you don’t need a server in Azure. As long as it’s running CentOS it can be on AWS, Google Cloud, or even be your own hardware.
4.1 Add Extra Packages for Enterprise Linux (EPEL)
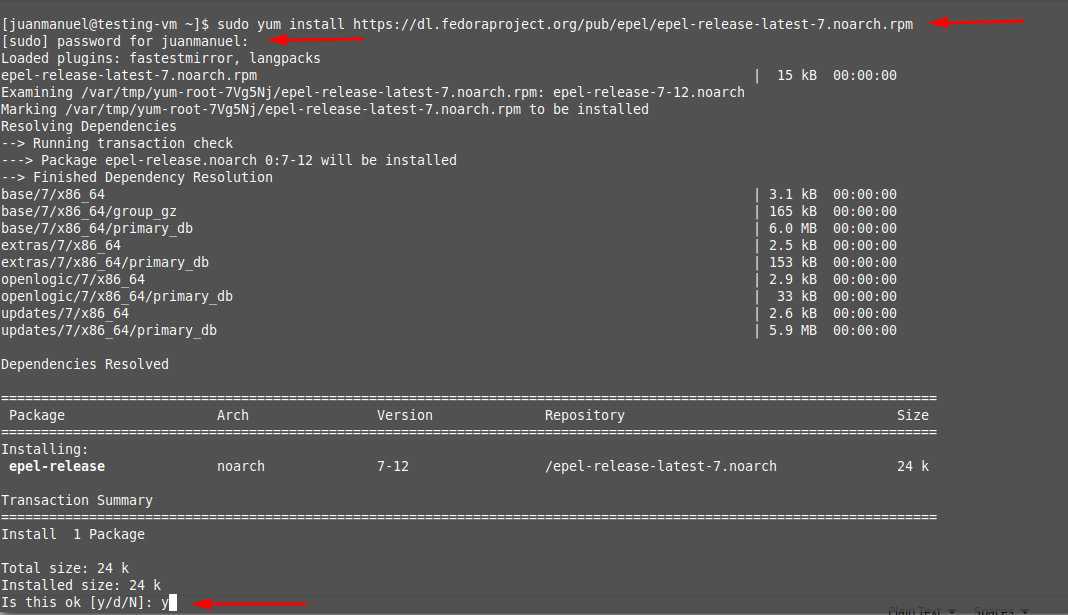
First we need to add EPEL to the list of repositories. Check https://fedoraproject.org/wiki/EPEL and choose the corresponding line for your version. You need to be root to perform this command, so start it with sudo. This is a program that allows users to run programs with the security privileges of another user, by default the superuser.
sudo yum install https://dl.fedoraproject.org/pub/epel/epel-release-latest-7.noarch.rpmPaste the command, write you password, and finally y.
4.2 Install R
Once EPEL is added, you can install R.
sudo yum install R4.3 Install R {packages}
Then we need to install, at least, one R package which is {shiny}.
sudo su - \
-c "R -e \"install.packages('shiny', repos='https://cran.rstudio.com/')\""
Since the Shiny server can also host RMarkdown documents, we are going to also install {rmarkdown}.
sudo su - \
-c "R -e \"install.packages('rmarkdown', repos='https://cran.rstudio.com/')\""
4.4 Download and install Shiny Server
Choose the right version for you here: https://rstudio.com/products/shiny/download-server/ and copy the link.
wget is a free utility for download of files from the web and we use it to download Shiny server from RStudio’s website. It may or may not be installed with you CentOS version, but if it’s missing you can install it by typing: sudo yum install wget
wget https://download3.rstudio.org/centos6.3/x86_64/shiny-server-1.5.12.933-x86_64.rpm
sudo yum install --nogpgcheck shiny-server-1.5.12.933-x86_64.rpm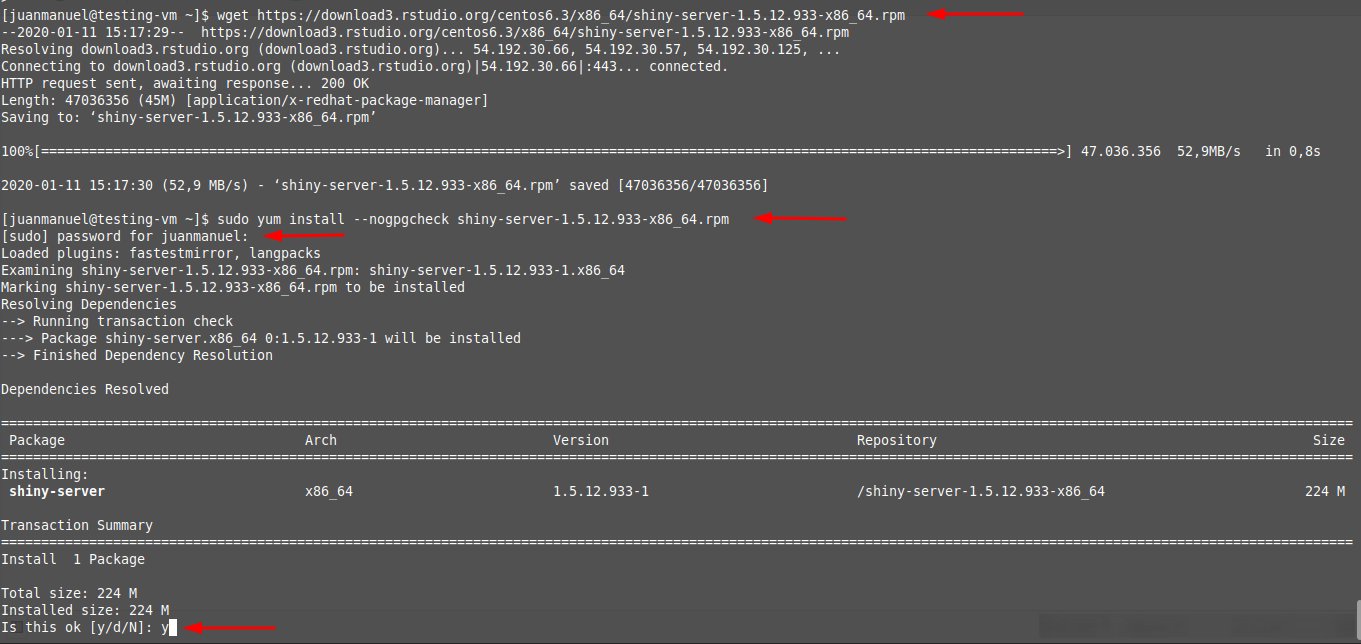
NOTE: Be sure to check the current version of Shiny Server in RStudio’s website, as the link in the code chunck above might be old.
5 Enable port 3838
We need to enable port 3838 because this is the port used by default to serve Shiny apps. You can change this from the config file, but we are going to stick to the defaults settings.
Click on Networking in the left pane, so you are in Home > testing-vm > Networking. Next click on “Add inbound port rule”.
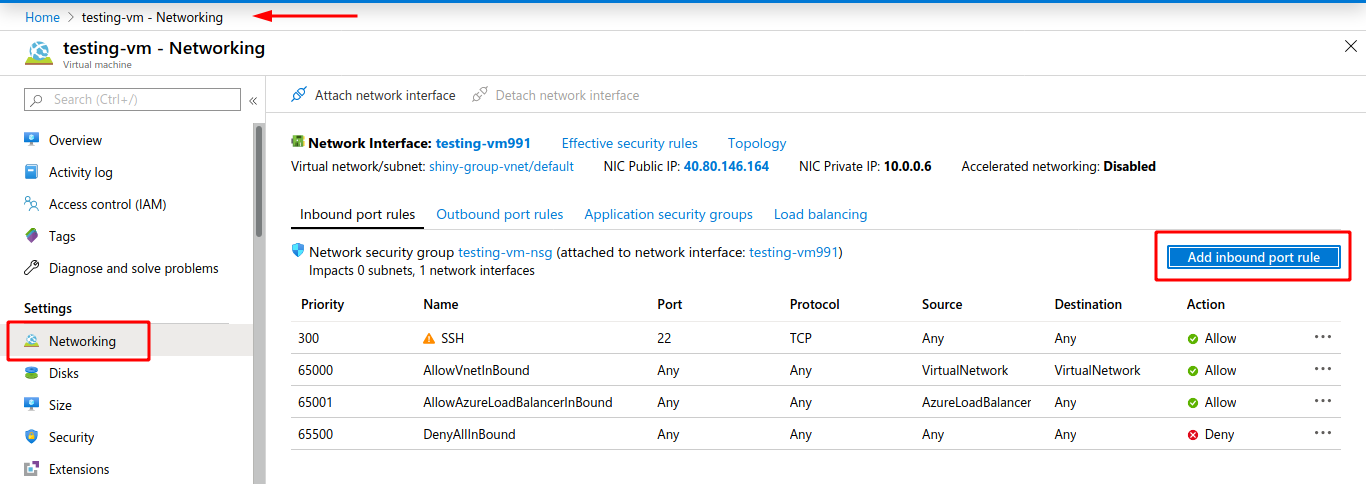
A pane in the right section of the screen will show up. Change the default “Destination port ranges” value from 8080 to 3838. In “protocol” select TCP and in “Action” Allow
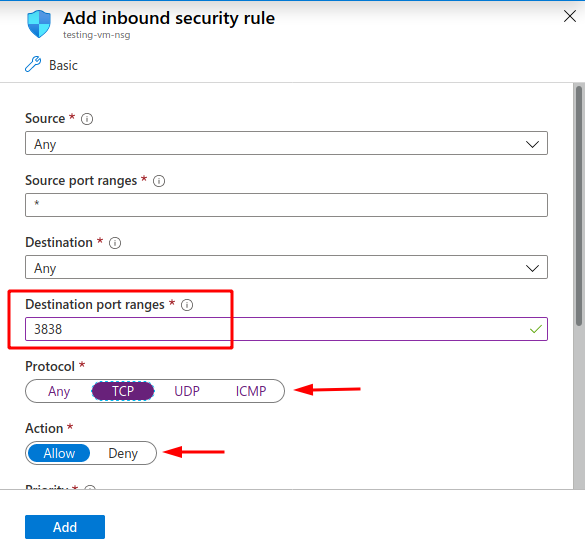
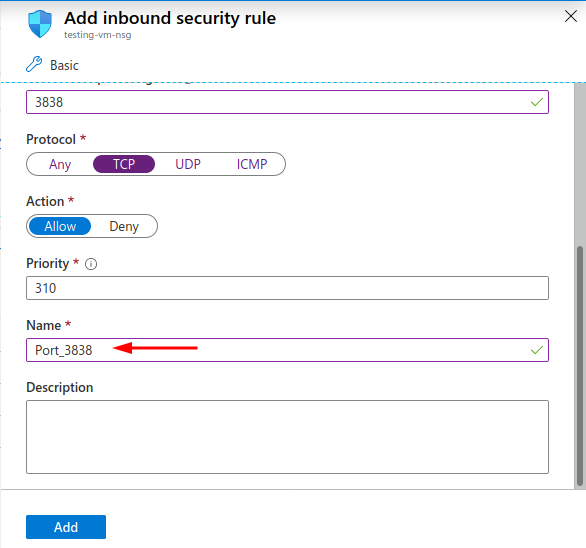
Scroll down and write a correct name and a description if you want. Finally, click on add.
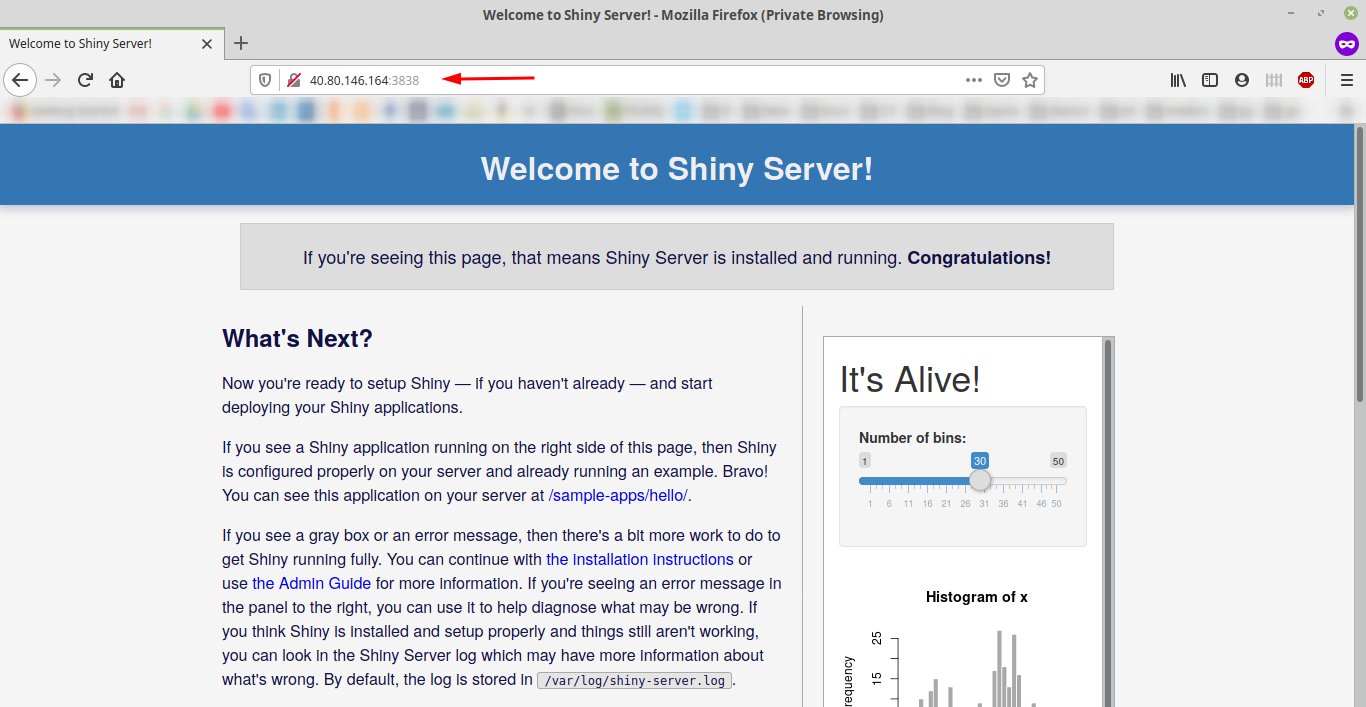
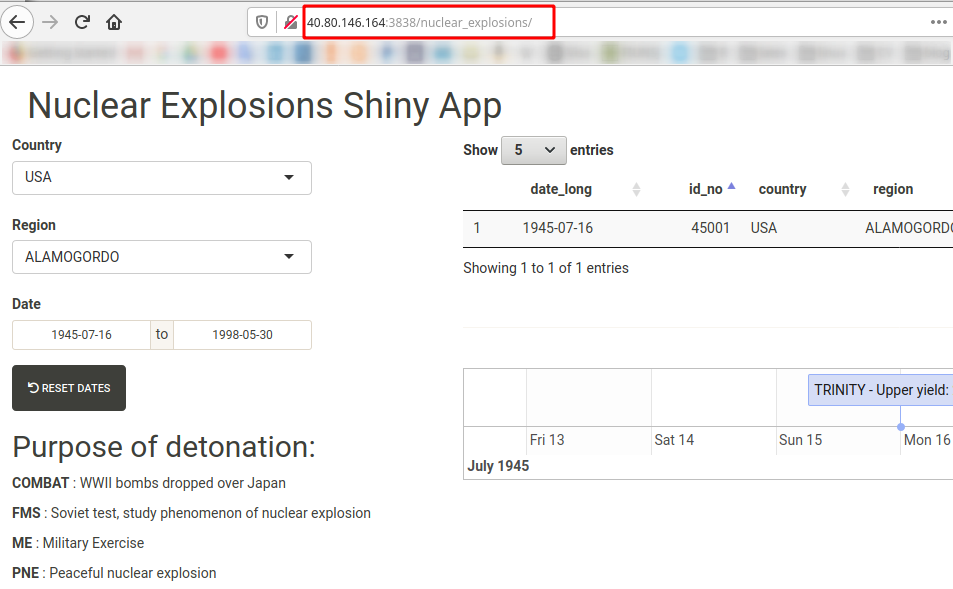
Go to your web browser and type the public IP of your server, colon, 3838. Something like this: 40.80.146.164:3838.
If everything is installed correctly, you should see the following screen:
6 Put your Shiny app in the server
We still need to put our Shiny app (either the ui.R and the server.R files or the app.R file) in the server. Regardless of the way you choose to put your Shiny apps in the server, by default they have to be in their own directory inside /srv/shiny-server/. In other words, the file structure expected by the server is something like this:
/srv/shiny-server/
  |
  |-- app_1_directory
  |     |
  |     |-- ui.R
  |     |-- server.R
  |
  |-- app_2_directory
        |
        |-- app.R
6.1 Using GitHub
To clone the app from GitHub, we need to install git first. In the terminal write:
sudo yum install git
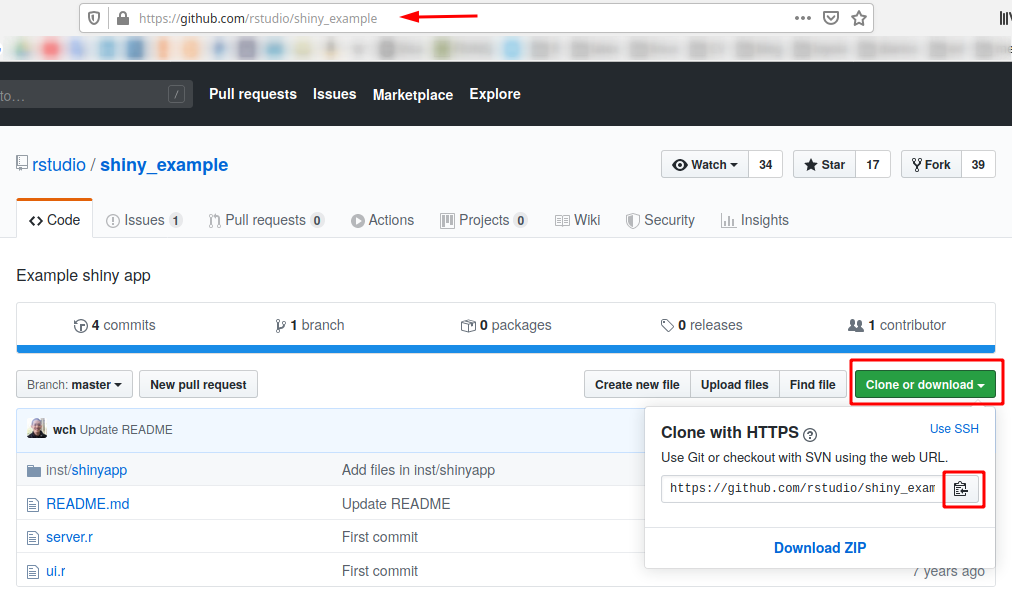
Let’s share our first app! From RStudio’s GitHub, we are going to clone one called “shiny_example”. It’s here: https://github.com/rstudio/shiny_example
There you have to click on the green button that says “Clone or download” and copy the link.
Now we need to move to the directory where Shiny apps are supposed to be saved. To do so we use cd as follows:
cd /srv/shiny-server/The image below shows how we moved from ~ to shiny-server.

Once there, clone the repository with:
sudo git clone https://github.com/rstudio/shiny_example.git6.2 Copy files from your local machine with scp
Alternatively one can copy a file from a local machine to the server. No GitHub needed here. Instead, we will use scp which stands for securely copy.
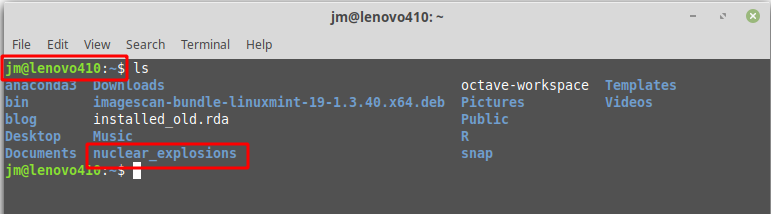
The app I will copy is one I made using tidy tuesday’s data set on nuclear explosions. It consists of a single app.R file which lives in my hard drive in the folder ~/nuclear_explosions. We are going to copy the whole folder.
The way to use scp is as follows (more details here):
# this is only to show how to use scp, it won't run
scp -r /local/directory remote_username@remotepublicIP:/remote/directory
The -r flag stands for “recursive”, and it’s basically telling “copy the folder with its content”.
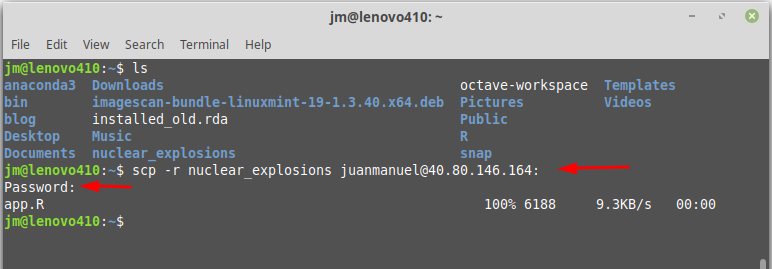
If you pay attention to the screenshot above you’ll note that I didn’t include anything after the colon. That’s because we will need writing permission in the destination directory. For further details on this, please see here.
Instead, writing the code up to the colon will copy the file to the home directory on the server and we do have writing permissions there. Using ls there, we can now see the nuclear explosions folder.

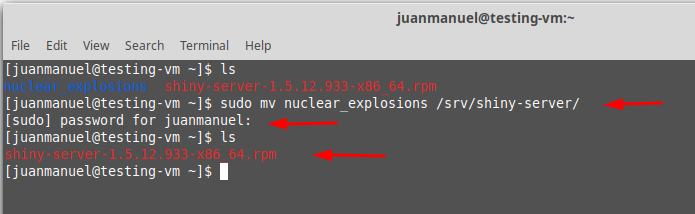
But we need the app in /srv/shiny-server/. The solution to this is to move the nuclear_explosions folder (this requires sudo).
sudo mv nuclear_explosions /srv/shiny-serverIf we now do ls once again, we no longer see the nuclear_explosions folder.
6.3 See your app running
Go to your browser and paste the following (remember, you will have a different public IP):
40.80.146.164:3838/shiny_example/
40.80.146.164:3838/nuclear_explosions/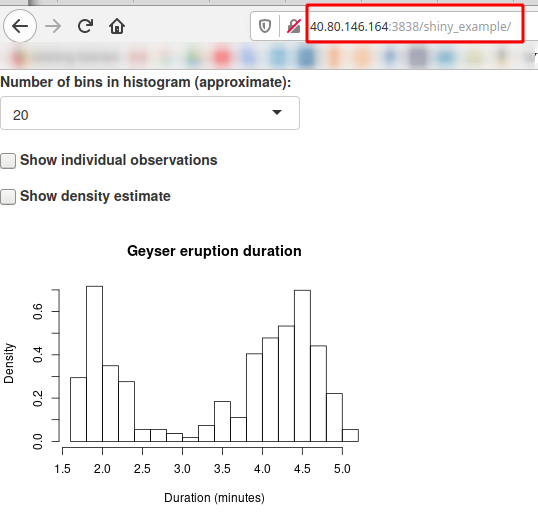
Finally, we can check that these two apps are living in /srv/shiny-server/. To do so:
cd /srv/shiny-server
ls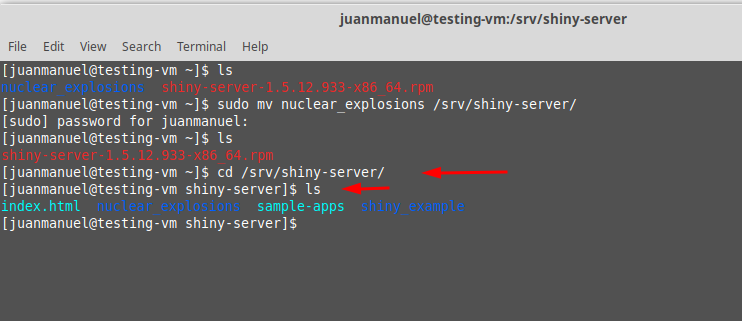
7 Additional resources
The README file in Shiny server GitHub’s repository is pretty good: https://github.com/rstudio/shiny-server/blob/master/README.md
The documentation for Shiny server is a great one also: https://docs.rstudio.com/shiny-server/
Dean Attali’s blog post: https://deanattali.com/2015/05/09/setup-rstudio-shiny-server-digital-ocean/
EDIT: You can find a shell script in my GitHub that will take care of the steps detailed in 4). Remember to check in RStudio’s website if the current version of Shiny Server matches the one in the script. You will still need to configure port 3838 as it’s shown in 5)